SMS Text Campaigns
Campaign Source
When building an SMS Text Campaign, Engage+ supports two different data sources:
- A table in the Messaging database
- The Engagement Data Platform (EDP)
The Campaign creation steps and features vary between the two data sources. This document focuses only on using a Messaging table as the Campaign data source. For more information on SMS Text Campaigns that use EDP as the data source, please see the Messaging Online Help.
Keyword Groups
Keywords are dedicated words or phrases that, when detected within a customer's incoming SMS text message, can be used to trigger some event within Engage+. Keywords are stored in groups so you can combine multiple spellings and other variations together, and trigger the same action off any keyword in the group.
Keyword Groups are used for the following primary purposes:
- Trigger an automated text message response back to the Campaign recipient.
- Change a recipient's opt-in / opt-out status.
- Collect data provided by the Campaign recipient, such as an email address, for example.
Create a keyword group
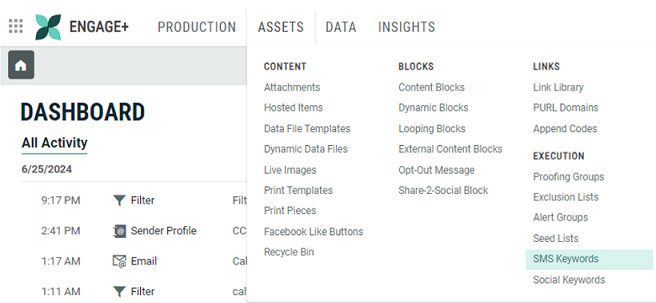
1. From the Top Navigation bar, select Assets > Execution > SMS Keywords.
2. Next to the search by name field, click the New button.
3. Enter a unique descriptive name for the Keyword Group.
4. Click Create.
In the SMS Keywords section, define an automated response keyword group
Enter all acceptable possible spellings, misspellings, and variations of the keyword, so you can respond appropriately even if the customer doesn't submit the exact keyword. For example, COUPON, CUPON, CUOPON, etc.
-
Type the desired text string into the Add New Keyword field.
-
Click the add/plus button.
-
Repeat the above steps as needed to add more keywords to the Keyword Group.
-
On the tool ribbon, Click Save.
Note that saving these changes may affect currently running campaigns.
Define a data capture keyword group
Keywords can be used to capture data about a customer. For example, you could ask customers to text you their email address, so they can receive future email messages. Messaging will detect the presence of email addresses in customers' text messages, and add that information to their records in the database.
Messaging uses Regular Expressions ("Regex") which provide a pattern matching syntax that allows you to validate that incoming data meets the expectation – for example, that an email address follows standard email address syntax.
-
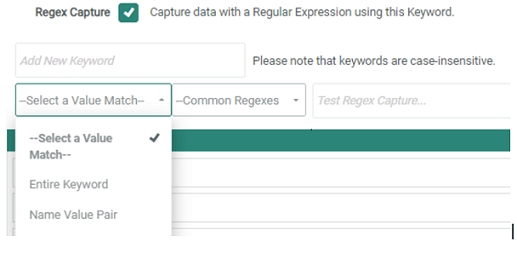
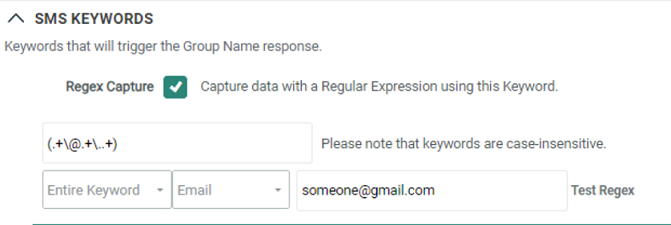
In the SMS Keywords section, check the Regex Capture check box.
-
Select the desired Regex type from the drop-down menu:
-
Entire Keyword: Used if the recipient is expected to send ONLY the desired data to be captured, without any other keywords or information within the message.
-
Name Value Pair: Used if the recipient is expected to send some keyword, followed by the desired data to be captured. For example, "NAME John." In this situation, the platform will recognize that the first word is the keyword, and the second word is the value that needs to be captured and stored in the database.
3. Enter the Regex syntax, or select a commonly-used syntax from the Common Regex drop-down menu.
4. To test the regex syntax, enter a value in the "Test Regex Capture" field, then click Test Regex. In the pop-up, the platform indicates whether that value would be captured or not.
Tip: To ensure the Regex syntax is capturing data as expected, test different values, both valid and invalid.
5. Click the add/plus button.
6. On the Tool Ribbon, click Save.
Note that saving these changes may affect currently running campaigns.
Change a recipient status
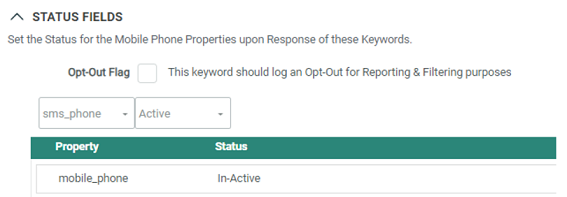
1. In the Status Fields section, from the drop-down menu, select the phone field you want to update.
2. Select the status to apply to the recipient's status field:
- Active — Change the Status ID field for this Phone field to "Active."
- Double Opt-in — Change the "double confirm" status field, rather than the main Status ID field. This option is intended to be used only for Confirmation Keywords, where consumers are confirming their desire to receive text messages.
- Inactive — Change the Status ID field for this Phone field to "Inactive."
- Opt-Out via Reply — Change the Status ID field for this Phone field to "Opt Out Via Reply."
3. Click the add/plus button.
4. On the Tool Ribbon, click Save.
Note that saving these changes may affect currently running campaigns.
SMS Text Campaigns
SMS Text messages are an immediate and personal way to interact with your customers. SMS messages must follow strict compliance rules that differ from country to country. Be sure you're aware of, and are meeting, compliance requirements where you're located.
Create the campaign
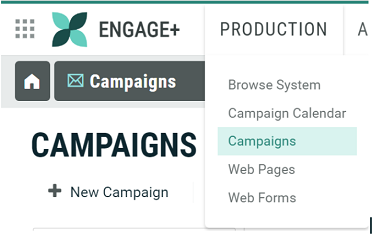
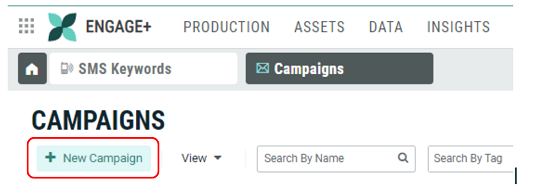
1. From the Top Navigation bar, select Production > Campaigns.
2. On the Tool Ribbon, click New Campaign.
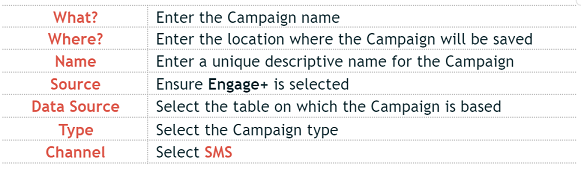
3. Select or enter the following:
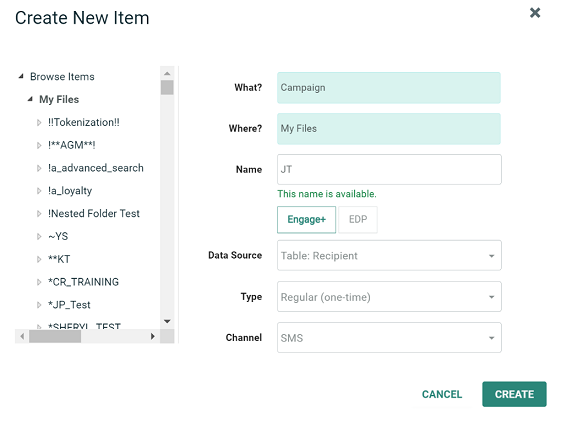
4. Click Create.
Set the sender profile and filter
The Sender Profile defines the shortcode from which the Campaign will be sent, and also controls the recipient's eligibility to be contacted. The Filter defines the target audience for the Campaign, and it is required for Date-triggered and Regular One-off Campaigns. If you're creating an Event-triggered Campaign, selecting a Filter is optional; the audience will be automatically set to “all triggered records.”
1. In the Sender Profile section, select the appropriate Sender Profile from the drop-down menu.
2. In the Audience section, use the Search tool on the Filter field to browse for an existing Filter, or use the add/plus button to create a new Filter.
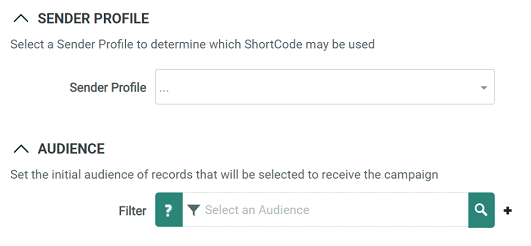
3. On the Tool Ribbon, click Save.
Add de-duping logic
Because clients are billed based on the number of messages sent, and some recipients are billed based on the number of messages received, you want to be sure not to send duplicate messages to recipients who are in the database more than once.
1. In the Tool Ribbon, click Options > Restrict Campaign.
2. From the drop-down menu, select Add Deduping Logic.
3. The system adds a new Dedupe Logic section to the screen.
4. Within the Dedupe Logic section, select the appropriate mobile phone field from the Field drop-down menu.
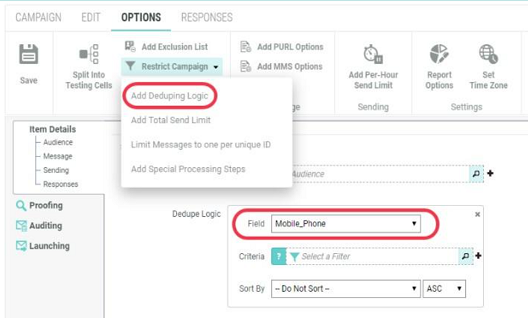
Note: The system will perform a byte-for-byte match on the values in this field to attempt to find duplicates.
5. Optionally, define the rules for picking the "winner" among a set of duplicate records:
-
Use Filter logic — In the Criteria section, use the Search tool on the Filter field to browse for an existing Filter; or use the New tool to create a new Filter.
-
Define a sort order — From the Sort By drop-down menu, select the field on which you want to sort. Then select whether you want to sort in Ascending or Descending order. Among a set of duplicate records, the system will keep the "top-most" record.
Note: If you don’t define the winner rules, the system will sort the duplicate set by the Primary Key ID field in descending order, then pick the top-most record. This default option roughly approximates picking the "most recently added" record.
6. On the Tool Ribbon, click Save.
Enter the message content.
The Message section is used to provide the content for your SMS Text Campaign.
1. From the Message Encoding drop-down menu, select either:
- Latin 9 (ISO)— Messages can be up to 160 characters in length, as long as all characters in the message conform to the Global System for Mobile Communications (GSM) encoding standard.
- Unicode — Messages can be 70 characters in length.
Note: The character limit appears below the Message Content field, and changes to reflect the selected encoding method, and the length of the content that's been entered.
2. Enter the Campaign content into the Message Content field.
3. To add personalization, click into the Message Content field to open the Personalization Panel on the right.
4. At the top of the Personalization Panel, select an item to be used in the SMS message. An item from the Personalization Panel can be added by:
- Drag-and-drop — Drag-and-drop the item from the top of the Personalization Panel directly into the desired position on the content area.
- Double-click — Position the cursor in the desired position within the content area, then double-click the item in the Personalization Panel.
Hint: When adding personalization to a text message, the character count below the message reflects the number of characters in the Merge Symbol, not the actual value of the personalization (which will likely vary from one message to the next).
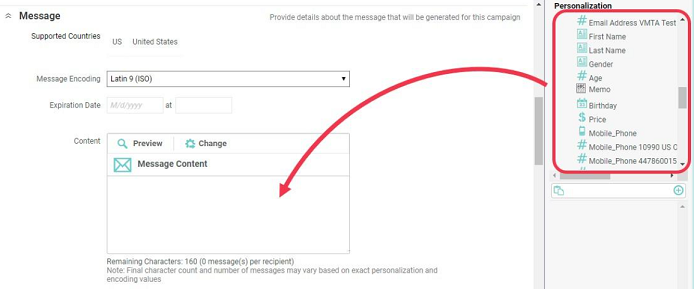
5. On the Tool Ribbon, click Save.
Tip: Click Preview at any time to view the creative.
Insert MMS content
Multimedia Messaging Service (MMS) extends the functionality of core SMS text messages, by allowing you to include an image, video, or audio clip in the message, along with the text component.
Note: To use MMS, you must select a Sender Profile that has been provisioned for MMS.
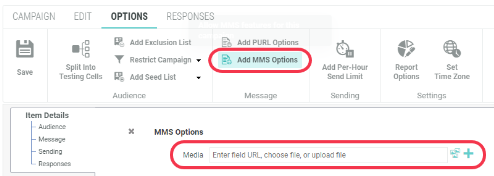
1. In the Tool Ribbon, click Options > Add MMS Options.
2. The system adds a new MMS Options section to the screen. Also, the "character counter" beneath the Message Content section changes to a "file size counter." An MMS message is constrained by the total file size of the entire message, rather than by the character count.
Note: Size limits are determined by your country's mobile carrier and typically range from 300 kilobytes to 500 kilobytes per message.
3. Indicate the multimedia file that you want to include in the message:
- External asset — Enter the URL to the asset.
- Existing Hosted Item — Click the Hosted Item icon, and navigate to and select the hosted item.
- Upload new Hosted Item — Click the plus sign icon to upload a new Hosted Item. Browse to and select the asset.
4. On the Tool Ribbon, click Save.
Schedule a send time for the campaign
Campaigns can be deployed immediately, or scheduled to deploy at a date and time in the future. To schedule a Campaign, two components must be set: the message creation time (also called the "Advance Queue Schedule") and the send time.
1. Navigate to the Edit screen from the top tool ribbon, then scroll down to the Sending section.
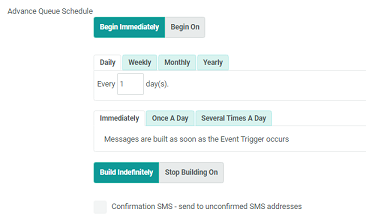
2. Next to Advance Queue Schedule, you can configure the message to be sent immediately or on a specific date. To configure the message to be sent on a specific date:
- Click Begin on and enter the appropriate date and time to begin building messages.
- Or, click Begin Immediately if you want to begin building messages immediately after the Campaign is launched.
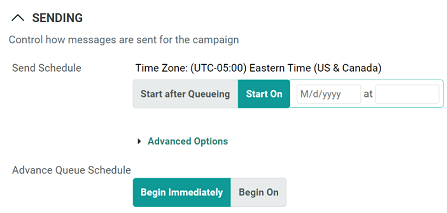
3. You can also set a set a send time, next to Send Schedule:
- Click Start on and enter the appropriate date and time to deploy the Campaign.
- Or, click Start after Queueing if you want to begin deploying messages immediately after they're built.
Important: The message creation date / time must be before the send date / time.
Set an event trigger
Event-triggered Campaigns send messages to recipients based on a defined event, such as submitting a keyword response, or importing recipients into a specified folder.
1. On the Tool Ribbon, click Add Trigger.
2. From the Trigger drop-down menu, select a Trigger type. A "Build File Import Criteria" pop-up window is displayed.
3. Enter or select the criteria for the Trigger.
4. Click Save Criteria.

Note: By default, the audience for an Event-triggered Campaign is "all triggered records." Optionally, you can select a Filter if you need to apply additional restrictions to identify and select only a subset of the triggered records.
Set the recurring schedule
Date-triggered Campaigns send messages to recipients based on a schedule that will check the audience Filter on a recurring basis.
In a Date-triggered Campaign, the Recurrence Schedule is used to control both the message creation and sending phases. You can set a start date / time to control when the Recurrence Schedule initially goes "live," and also define the recurrence frequency. The default recurrence frequency is to build and send messages "daily, every day, at 9:00 AM."
1. Scroll down to the Sending section on the main Campaign screen.
2. Select when you want the Recurrence Schedule to go live:
- If you want the schedule to go live immediately when the Campaign is launched, select Begin Immediately.
- If you want the schedule to go live at a later date and time, select Begin on and enter the appropriate date and time.
3. Define the Recurrence Schedule frequency interval -- daily, weekly, monthly, or yearly.
Tip: For each interval option, you can define additional detail, such as which days of the week, or a specific day of the month, for example.
4. Define the time of day when messages are created and sent. You can choose from the following:
- To send once a day, select Once a Day, and select the time.
- To send multiple times a day, select Several Times a Day, and define the frequency.
Bind an automated response keyword group to a campaign
If a recipient replies to an SMS Text Campaign, and the reply contains a designated keyword, you can configure an automated reply back to that recipient.
In order to use a Keyword Group to send an automated reply, you must "bind" the Keyword Group to the Campaign. A Keyword Group can be bound to only one Campaign at a time. If you use a Keyword Group in a Campaign, then later need to reuse that same Keyword Group in a second Campaign, the best practice is to stop or cancel the first Campaign.
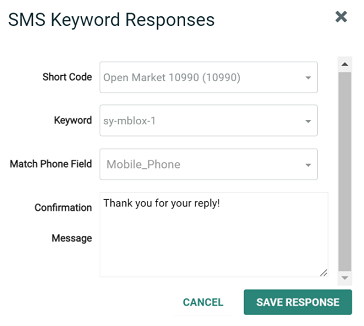
1. In the Tool Ribbon, click Responses > Add Keyword Response.
2. From the Short Code drop-down menu, select the Short Code to which customers will text their responses.
3. From the Keyword drop-down menu, select the keyword group you previously created.
4. From the Match Phone Field drop-down menu, select a Phone type field on the Campaign's source table.
5. In the Confirmation Message text field, enter the confirmation message that will automatically get sent back to the customer upon receipt of one of the keywords in the selected Keyword Group.
6. Click Save Response.
7. Optionally, in the Expiration Date field in the Message section, enter an end-date for sending Keyword-driven automated responses.
8. On the Tool Ribbon, click Save.
Bind a data capture keyword group to a campaign
When you bind a Data Capture Keyword Group to a Campaign, you must indicate what field you want to update with the data the recipient provided in their reply.
1. In the Tool Ribbon, click Responses > Add SMS Data Capture.
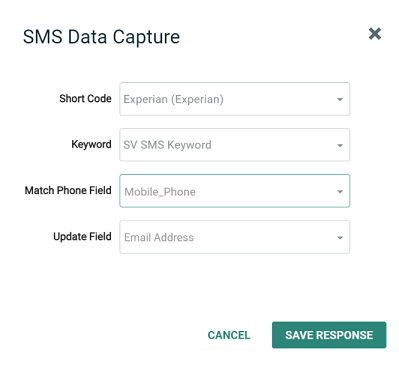
2. From the Short Code drop-down menu, select the Short Code to which customers will text their responses.
3. From the Keyword drop-down menu, select the Data Capture Keyword Group.
4. From the Match Phone Field drop-down menu, select a Phone type field on the Campaign's source table.
5. From the Update Field drop-down menu, select the field where you want to store the data provided in the recipient's reply.
6. Click Save Response.
7. On the Tool Ribbon, click Save.
